Join me on Facebook
The good news is, I recently created the Blame The Monkey Facebook Fan Page. The bad news is, I only have 19 friends…
Maybe it’s my deodorant or the fact that I fling a heathy portion of poo now and again. I can’t say for certain.
So, join me on Facebook, and Monkey around a bit. — I promise I’ll change deodorant brands.
Daily Banana – The Convent – (Ruínas do Carmo)
well worth the work
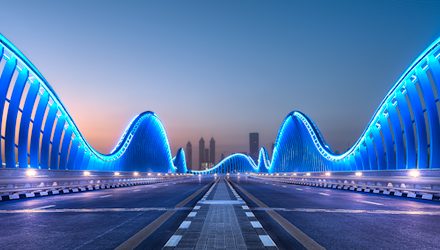
Though panoramic images can produce very interesting perspectives and angles, they also can be extremely labor intensive, especially when you throw HDR into the mix.
In an attempt to speed up the process, here’s a solid attack strategy that always works for me:
– Remember that, with HDR Panoramas, you should have multiple shots, each containing multiple exposure brackets. I like to organize them into folders. For example, this (vertical) pano is composed of 7 HDR Images. Each HDR Image is made up of 7 exposure brackets. So, that gives me 7 folders, each containing 7 images. For a good introduction, visit the HDR Panorama Tutorial.
– First, align all the exposure brackets to prepare them for Photomatix. This pano was shot entirely handheld so it’s important to make sure everything lines up perfectly before we convert it into an HDR. I use photoshop to do it since it’s much better at image alignment than photomatix. Photoshop also allows you to view and tweak the result. Photomatix does not. Read my Handheld HDR Tutorial for more information.
– Next, create the HDR images. You can do each one by hand or you can use the Batch feature in Photomatix. Either way, the important thing here is consistency. You want the same settings in Photomatix for each image (I find it easiest to create & apply a custom preset). So, keep it simple and make sure it’s consistent for all the images. This helps prevent color & contrast shifts in the Panorama.
– Now that you have all of the HDR Images ready, it’s time to create the Panorama. Photoshop can automatically generate panoramic images. It’s as simple as selecting, File / Automate / Photomerge & It sometimes does a good job. However, If you want more power & flexibility over your panos, try Autopano Giga. Just be warned, once you use it, you’ll be hooked.
– Now that your Panorama has been created, It’s now just like any other photo (except it’s freaking huge). Now you can use Photoshop to add (or remove) more color, texture, and contrast. Consume liberal portions of caffeine as necessary.
– Lastly, don’t forget to post it online and send me the link 😉
Technical Mumbo Jumbo:
– Nikon D700 – Nikkor 14-24 f/2.8@ 14mm f/8 Iso: 100
– 7 X 7 (handheld) Exposure Brackets (-3,-2,-1,0,1,2,3)
– HDR Photography Processing & Tone Mapping using Photomatix Pro
– Panorama Stitched using Autopano Giga
– Post Processing & Color Correction in Photoshop
– Enhanced detail with Nik Software Sharpener Pro
– Found Dr. Seuss Land?
(move the slider to compare before and after)
[beforeafter]
")
 [/beforeafter]


